
The Easiest and Fastest Ways to Remove Stubborn Tree Stumps
That Stump in Your Yard Is More Than Just an Eyesore
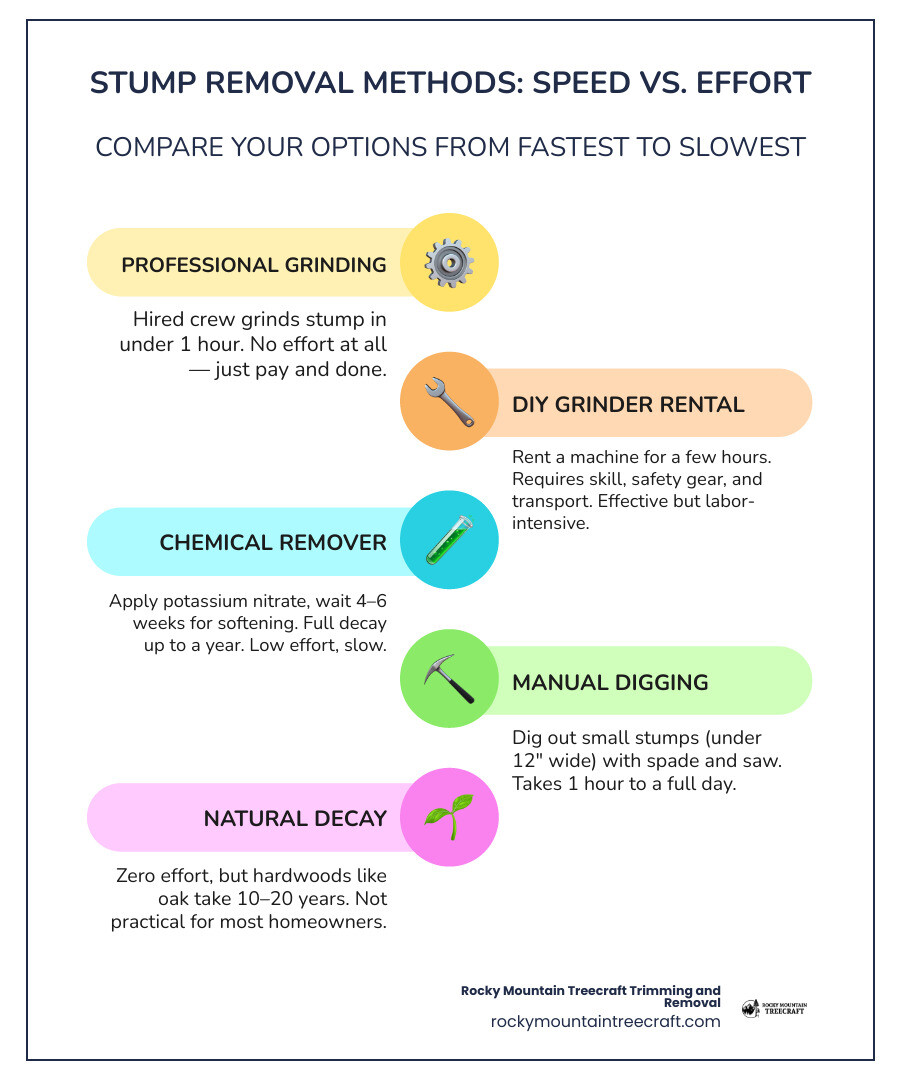
The easiest way to remove a stump depends on your timeline, budget, and how much physical effort you want to put in. Here's a quick breakdown:
Hire a professional to grind it — fastest and least effort; done in under an hour
Rent a stump grinder — DIY grinding; takes a few hours but requires skill and safety gear
Use a chemical stump remover — low effort but slow; softens wood in 4 to 6 weeks, full decay up to a year
Dig it out by hand — works for small stumps under 12 inches wide; takes an hour to a full day
Let it decay naturally — zero effort, but hardwoods like oak can take up to 20 years
Most homeowners in Heber City find that professional stump grinding gives the best balance of speed, safety, and results — especially for stumps that are close to structures, fences, or irrigated lawn areas.
That said, every situation is different. A stump tucked in the back corner of your property is a very different problem than one sitting in the middle of your lawn where your mower clips it every week. You mow around it for a season, maybe two. Then you trip over it once, or a wheel catches the edge and you're done waiting.
Stumps also attract pests, send up unwanted new shoots, and make landscaping a hassle. Left long enough, they become a real problem — not just an annoyance.
This guide walks you through every practical removal method so you can choose what actually works for your yard.
Why Stump Grinding is the Easiest Way to Remove a Stump
When it comes to pure speed and minimal physical exertion, mechanical grinding is hands down the easiest way to remove a stump. Instead of waiting months for chemicals to take effect or spending a grueling weekend digging through rocky mountain soil, a high-powered grinder shreds the solid wood of the stump into harmless mulch in a matter of minutes.
A professional Stump Grinding service uses a machine equipped with a heavy, fast-spinning wheel lined with carbide-tipped teeth. The operator sweeps this cutting wheel back and forth across the stump, gradually shaving the wood down. In less than an hour, an average-sized tree stump is reduced to a pile of wood chips, reaching 6 to 12 inches below the ground surface.
This mechanical shredding completely destroys the main structural crown of the stump. By grinding beneath the grade, you break up the connection points for the major lateral roots, preventing the tree from easily sprouting new shoots.
However, you should keep in mind that the volume of wood chips produced by grinding is approximately four times the volume of the original solid stump. This massive expansion happens because the solid wood is aerated and broken down into fluffy shavings.
If left in the ground, these fresh wood shavings can drastically alter the soil's structure, moisture-holding capacity, and nutrient balance. Specifically, as soil microbes work to break down the carbon-rich wood chips, they consume large amounts of nitrogen, making it incredibly difficult for grass or new plants to grow in that spot. To protect your yard's soil health, the best approach is to shovel out the excess wood chips, use them elsewhere as mulch, and backfill the hole with fresh, nutrient-rich topsoil.
For a deeper look at how this process compares to other methods, you can read the How to Remove a Stump Quickly: 2026 Guide for Homeowners.
Is Stump Grinding the Easiest Way to Remove a Stump for DIYers?
Renting a stump grinder from a local home improvement store is a common route for ambitious DIYers, but it is rarely as easy or cost-effective as it looks on paper.
First, let's look at the costs. Renting a commercial-grade stump grinder typically costs between $100 and $400 per day. When you add in the cost of fuel, taxes, and purchasing the necessary safety gear, the savings compared to hiring a professional are often minimal.
Second, these rental machines are heavy, bulky, and incredibly difficult to transport. You will need a truck with a ramp or a dedicated trailer, along with the physical strength to load and unload a machine that can weigh anywhere from 150 to over 1,000 pounds. Once on your property, maneuvering a rental grinder across sloped lawns or through tight garden gates can be an exhausting chore.
Safety is another major concern. Stump grinders are incredibly powerful machines that kick up rocks, dirt, and heavy wood shards at high speeds. Operating one safely requires complete personal protective equipment (PPE), including:
Heavy-duty safety goggles or a full-face shield
Ear protection (earplugs or earmuffs)
Heavy leather work gloves
Steel-toed boots
Long pants and sleeves to protect against flying debris
Furthermore, our local mountain soils in Wasatch and Summit Counties are notoriously rocky. If a rented grinder's teeth strike a buried boulder, it can cause violent kickback, damage the machine, or result in severe injury. If you are dealing with multiple stumps, or if you have any questions about the process, checking our FAQs can help you decide if a DIY rental is truly worth the risk.
Chemical and Natural Decay: The Easiest Way to Remove a Stump Without Heavy Equipment
If you want to avoid heavy machinery, loud noises, and backbreaking physical labor, chemical decomposition is the most hands-off DIY option available. This method relies on active ingredients like potassium nitrate (often sold as commercial chemical stump removers) to accelerate the natural breakdown of the wood's organic polymers, specifically lignin.
To understand why this is so appealing, you have to look at the alternative. Letting a stump decompose completely on its own is an incredibly slow process. In our dry, high-altitude climate here in Utah, the lack of consistent moisture and warmth severely slows down the wood-decaying fungi that eat away at dead wood. A hardwood stump like an oak can easily take up to 20 years to rot naturally, while softer woods like pine can still take 7 to 10 years to disappear.
Using a chemical stump remover speeds up this natural timeline significantly. It can show noticeable softening of the wood in 4 to 6 weeks, though it can still take up to a full year for the stump to completely decay to the point where it can be easily broken apart with an axe or shovel.
For those interested in exploring these low-impact options, you can read more on How to Kill a Tree Stump Safely and Effectively.
To help you weigh your options, here is a visual timeline comparing chemical decay against other common removal methods:
Step-by-Step: The Easiest Way to Remove a Stump Using Chemicals
If you have decided that the chemical method fits your timeline, following a precise, step-by-step process is crucial to achieving the best results. Here is how to do it safely and effectively:
Trim the Stump Low: Use a chainsaw to cut the stump as close to the ground as possible. This removes excess wood and gives the chemicals less material to travel through.
Drill the Holes: Using a 1-inch or larger spade bit, drill vertical holes into the top of the stump. These holes should be 8 to 12 inches deep and spaced roughly 3 to 4 inches apart. To maximize chemical absorption, drill additional holes into the sides of the stump at a 45-degree angle, intersecting with the vertical holes.
Apply the Chemical: Pour potassium nitrate granules into the holes. Use a funnel to prevent the chemical from spilling onto surrounding grass or soil, as concentrated salts will kill your lawn.
Add Moisture: Rather than pouring water directly into the holes—which can flush the chemical out and turn it into an ineffective paste—use a spray bottle to lightly mist the granules. Moisture is essential to activate the chemical reaction.
Cover and Seal: Cover the treated stump with an opaque plastic tarp or a black bucket, securing the edges with heavy rocks or bricks. This serves two purposes: it blocks out sunlight and traps moisture to speed up decay, and it protects curious pets and children from coming into contact with the chemicals.
Wait and Monitor: Check the stump every few weeks. In our dry climate, you may need to lightly mist the holes occasionally to keep the moisture levels up. After 4 to 6 weeks, the wood should begin to feel spongy and soft.
Chop and Restore: Once the wood has completely decayed, use a mattock, axe, or sturdy spade to break apart the softened pulp. Dig out the remaining root fragments.
Important Note: Because chemical stump removers rely on concentrated salts that settle deep into the soil, you must wait at least 6 months after the stump is completely decomposed before planting anything new in that exact spot.
For more tips on maintaining a healthy yard during landscaping projects, check out our Tree Care Tips.
Manual Digging and Methods to Avoid
For those who prefer immediate results without renting heavy equipment or waiting months for chemicals, manual digging is a classic option. However, manual extraction is incredibly labor-intensive and only practical under specific circumstances.
If you do attempt to dig out a stump, the secret to success is leveraging physics. One of the most common mistakes homeowners make is cutting the tree trunk flush with the ground before they start digging. If you leave exactly 4 to 6 feet of the trunk standing, you gain a massive amount of leverage. As you dig around the base, you can push and pull the tall trunk back and forth, using the weight of the tree itself to help snap the deep, vertical taproots underneath.
While digging is physically demanding, there are other DIY methods that are outright dangerous and should be avoided entirely. The most common of these is stump burning.
Many online guides suggest drilling holes, soaking the stump in diesel fuel or kerosene, and setting it on fire. We strongly advise against this, especially in Utah. In our dry mountain valleys and wildland-urban interface areas, open burning carries extreme wildfire risks.
Furthermore, tree roots can smolder underground undetected for days, traveling along root paths and potentially igniting dry soil, organic matter, or nearby structures long after you think the fire is out. Additionally, using chemical accelerants like diesel can permanently contaminate the surrounding soil, making it impossible to grow healthy grass or plants in the future.
To learn more about the risks and legalities of burning, you can read Stump Removal: The Foolproof Method for Complete Elimination.
When is Manual Digging Best for Small Stumps?
Manual digging is really only the easiest way to remove a stump if you are dealing with a small specimen—specifically stumps that are less than 12 inches in diameter. Trying to manually dig out a mature hardwood stump is a recipe for physical exhaustion and broken tools.
If you are tackling a small stump, you will need a few essential hand tools:
A sharp spade to clear away dirt
A mattock or grubbing hoe to break through tough clay and rocks
A pruning saw or heavy-duty loppers to sever lateral roots
A long steel pry bar for leverage
The process starts by digging a wide trench around the base of the stump, exposing the thick lateral roots that anchor the tree to the surrounding soil. Do not just make a single cut into these roots; instead, use your pruning saw to cut out a 5-to-10-centimeter section of each root. This provides necessary "wiggle room" so the stump can shift as you rock it. Once the lateral roots are severed, you can use your pry bar and the remaining trunk leverage to tilt the stump, exposing the downward-pointing taproot underneath so you can make the final cut.
If you realize a stump is too large for manual digging, or if you want to avoid the physical strain entirely, it may be time to consider professional Tree Removal and stump extraction.
Frequently Asked Questions About Stump Removal
Removing a tree stump often brings up a lot of questions about yard safety, lawn care, and long-term landscape planning. Here are the answers to the questions we hear most frequently from homeowners.
How long does it take for a tree stump to rot naturally?
Without any human intervention, a tree stump can take anywhere from 7 to 20 years to rot completely. The exact timeline depends heavily on the tree species and your local climate.
Softwood stumps, such as pine, spruce, or fir, are less dense and contain resins that break down relatively quickly, usually rotting away in 7 to 10 years. Hardwood stumps, like oak, maple, or ash, are incredibly dense and can easily resist decay for up to 20 years.
In northern Utah's semi-arid climate, this process takes even longer. Because our soils are dry for much of the year and freeze solid during the winter, the biological fungi and bacteria needed to break down wood are only active for a few short months out of the year.
Can a tree grow back from a leftover stump?
Yes, many tree species can easily sprout back to life from a leftover stump. When a tree is cut down, the active root system beneath the surface often remains alive. In an attempt to survive, the roots will send up rapid, leafy sprouts called "suckers" or "stump sprouts."
To prevent this unwanted regrowth, you must target the cambium layer—the ring of living tissue located just beneath the outer bark of the stump. Within 24 hours of making a fresh cut, apply a concentrated herbicide labeled for woody plants (such as those containing glyphosate or triclopyr) directly to this outer ring. The living tissue will draw the herbicide down into the root system, killing it permanently.
What should I do with the hole and wood chips after grinding?
Once stump grinding is complete, you will be left with a deep hole and a large pile of fresh wood chips.
First, shovel out the excess wood chips. Do not mix fresh wood chips directly into the soil where you plan to replant, as this causes nitrogen lock-up and will starve new plants of essential nutrients for up to two years. Instead, use these wood chips as a top mulch in non-sensitive garden beds, or add them to your compost pile to age for 3 to 4 months.
Next, fill the remaining hole with high-quality, clean topsoil mixed with a bit of organic compost. Pack the soil down firmly in layers to prevent major settling later, and water the area thoroughly. Let the soil settle for a few weeks before laying new sod, planting grass seed, or adding new plants to the area.
Reclaim Your Yard with Professional Stump Grinding
At Rocky Mountain Treecraft, we know that your home is your sanctuary, and an unsightly, hazardous stump has no place in a beautiful yard. Operating locally out of Heber City, Utah, we specialize in fast, reliable, and professional tree services tailored specifically to the unique soils, climates, and property needs of Wasatch and Summit Counties.
Whether you are in Midway, Park City, Kamas, or right here in the Heber Valley, our team has the local expertise and specialized equipment to safely grind away stubborn stumps without damaging your surrounding landscape. We handle the heavy lifting, the flying debris, and the cleanup so you can get back to enjoying a safe, level, and beautiful lawn.
Don't let a leftover stump get in the way of your next landscaping project, patio install, or weekend mow. Schedule Professional Stump Grinding with Rocky Mountain Treecraft today, or contact us to request a free estimate!