
How to Trim Emerald Cedars in 5 Easy-to-Follow Steps
Can You Trim Emerald Cedars Safely?
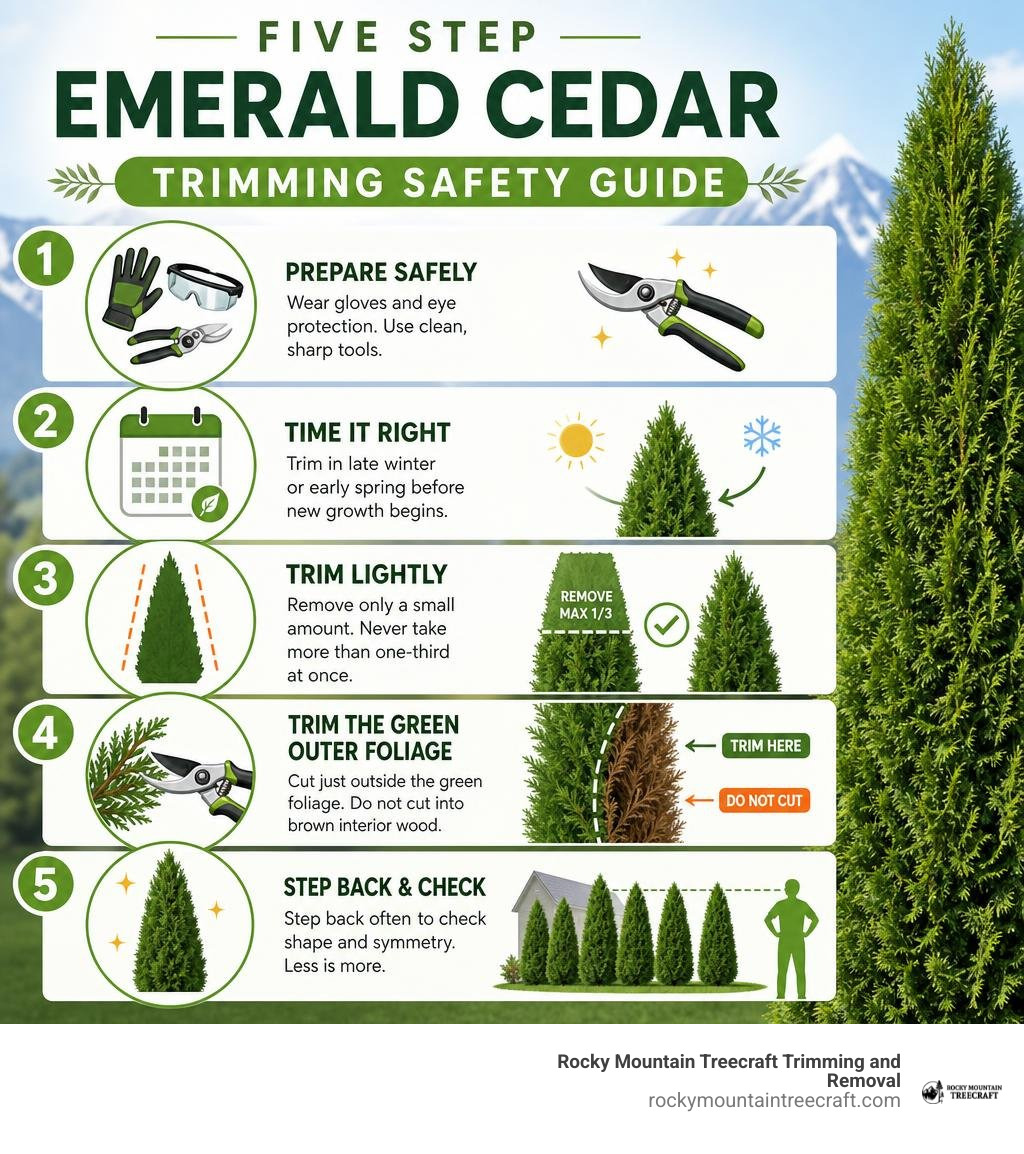
Can you trim emerald cedars? Yes. Light, careful pruning can keep Emerald Cedars, also called Emerald Green arborvitae, neat and healthy without harming them.
The key is simple: trim only the living green outer foliage. Avoid cutting deeply into the brown, bare interior wood, because these evergreens usually will not grow green needles back from that area.
For homeowners in Heber City, Heber Valley, and Wasatch County, timing and technique matter. Heavy snow, strong winds, dry summers, and early freezes can add stress to a freshly trimmed evergreen. This guide explains how to shape your cedars while protecting their natural dense form.
Quick answer What to do Can they be trimmed? Yes, with light pruning and clean cuts. Best time Late winter or early spring, before active new growth. How much is safe? Keep removal modest. Never take more than one-third at once. Biggest mistake Cutting into brown interior wood or flat-topping the tree.
Arborvitae Basics: Can You Trim Emerald Cedars Without Damaging Them?
Emerald Cedars (Thuja occidentalis 'Smaragd') are among the most popular evergreen choices across Wasatch County landscapes. Known for their narrow columnar shape and brilliant green foliage, these evergreens add privacy and structure to residential properties. When planted in ideal conditions, Emerald Cedars grow roughly 8 to 12 inches per year, eventually reaching mature heights of up to 15 feet and widths between 3 and 4 feet.
Because they grow continuously, many homeowners ask if can you trim emerald cedars without causing long-term harm. The answer is yes, provided you understand the growth mechanics of conifers.
Unlike deciduous hardwood trees that carry latent buds beneath thick bark, evergreens store their photosynthetic power in their active outer green shell. As the tree grows outward, inner foliage is shaded from sunlight. Starved of light, interior needles naturally turn brown and drop, creating a central "dead zone."
When pruning, you must stay strictly within the green foliage zone. Trimming back the tips of young branches stimulates thicker foliage growth and maintains a tight, dense appearance. However, removing too much canopy forces the tree to spend energy repairing cuts rather than generating new leaves. As a general rule, never remove more than 10% to 25% of the total living foliage in a single season. To learn more about proper evergreen maintenance, explore this Guide on shaping emerald green arborvitae.
Can You Trim Emerald Cedars into Old Interior Wood?
The single most common mistake homeowners make when pruning arborvitae is cutting back into old interior wood. Conifers in the Thuja family lack active dormant buds on mature, leafless woody stems. Once you trim past the outer green shell into the bare brown interior, that portion of the branch cannot generate new growth.
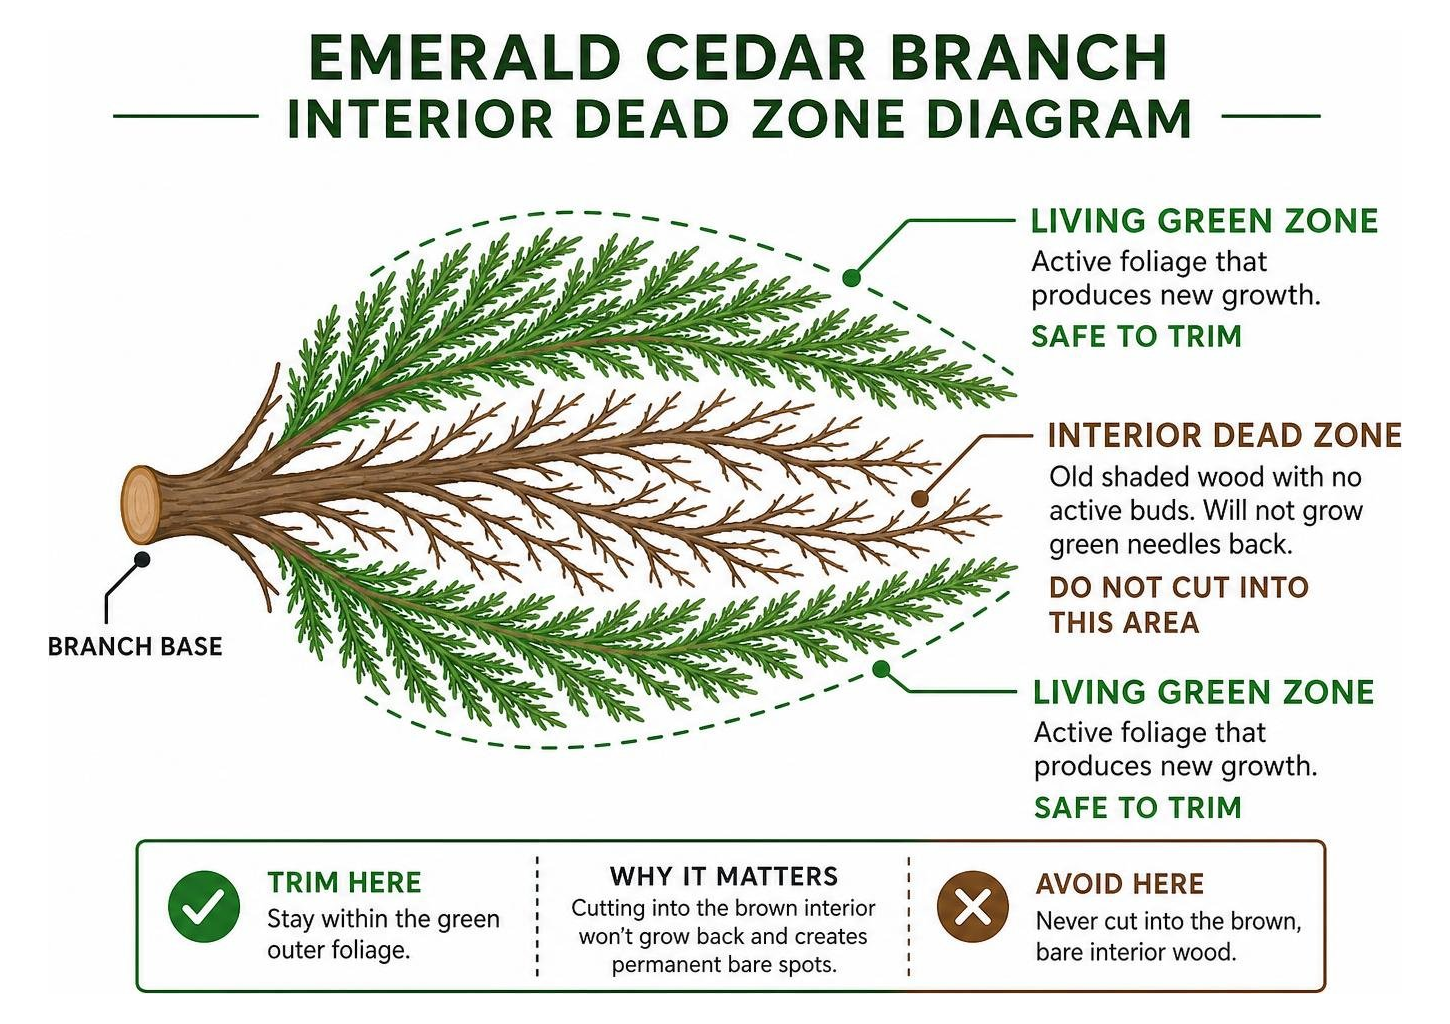
If a hedge grows beyond property lines or obstructs garden pathways, attempting a drastic size reduction by cutting back past the green foliage leaves permanent brown patches. These unsightly open spots remain indefinitely, exposing interior stems to sunburn and moisture loss.
If you inherit an overgrown hedge, severe hard cuts into old wood will not restore a smaller, lush shape. Instead, maintaining an overgrown cedar requires delicate tip trimming on the green outer layer over several years, or evaluating whether structural management is appropriate. If you are uncertain about branch structural health or internal foliage depth, scheduling a professional Tree Health Assessment with our team can help you chart a safe care plan.
Why Topping Emerald Cedars Harms Tree Health
Topping involves cutting off the main vertical stems or central leader of a tree across a flat horizontal plane. While some property owners consider topping to limit hedge height, flat-topping an Emerald Cedar is severely harmful to the tree's health and structural stability.
When you chop off the top portion of an evergreen canopy, you cause immediate, massive photosynthetic loss. The tree reacts in stress mode, triggering rapid, weak vertical shoots known as "water sprouts." These dense clusters of thin branches sprout from the cut sites and create weak attachment points that break easily.
Furthermore, flat tops create a flat shelf where heavy snow accumulates during Wasatch County winters. In Heber City and throughout Heber Valley, wet snow loads resting on a flat canopy press directly into the interior framework, splaying branches apart or splitting main trunks down the middle. Reviewing this detailed Research on arborvitae topping risks confirms that improper topping accelerates structural decay and leaves evergreens vulnerable to fungal pathogens.
5 Easy Steps to Trim Emerald Cedars Safely

Pruning your evergreens does not have to feel overwhelming. By following a structured approach, you can maintain healthy foliage while preserving your privacy screen's beautiful shape. Here is our step-by-step guide to trimming your cedars safely.
Step 1: Gather Sanitized Tools and Safety Gear
Before making your first cut, prepare the correct equipment. Using dull or dirty tools tears plant tissue, leaving ragged cuts that heal slowly and invite fungal infections.
Bypass Pruners: Essential for precise cuts on small branches up to 3/4 inch thick. Bypass blades act like scissors, leaving clean tissue cuts.
Loppers: Useful for reaching deeper interior deadwood or thicker stems up to 1.5 inches thick.
Hedge Shears or Trimmers: Ideal for light surface shaping on formal hedges, provided blades remain exceptionally sharp.
Sanitizing Solution: Rubbing alcohol (70% isopropyl) or a diluted bleach solution to wipe down tool blades before starting and between trees.
Personal Protective Gear: Heavy-duty work gloves and safety glasses to shield eyes from flying evergreen debris and sharp branch tips.
A Stable Ladder: A sturdy A-frame ladder placed on level ground when working on upper hedge sections.
Always sanitize your tools between trimming individual plants. If one tree harbors a localized tip blight or fungal spore, unsterilized blades will carry that disease straight across your entire landscape row.
Step 2: Remove Dead, Diseased, and Damaged Branches
Begin pruning by inspecting the interior structure of the tree. Discarding non-functional or damaged growth improves air movement through the canopy, reducing humidity build-up that encourages fungal pathogens.
Reach into the canopy and make clean cuts to eliminate:
Dead Wood: Dry, brittle, brown stems that snap easily when bent. Cut these back to the main trunk or to an intersecting live branch collar.
Diseased Foliage: Stems displaying dark fungal lesions, tip browning, or insect galls.
Storm or Ice Damaged Branches: Limbs cracked or split by winter snow loads. Make angled cuts just outside the natural branch collar (the swollen ring where the branch attaches to the trunk) so the wound seals efficiently.
Opening up dense, overcrowded foliage improves sunlight penetration into the interior canopy, helping keep inner leaves as healthy as possible. For additional guidelines on managing evergreen canopy structure, check out our collection of practical Tree Care Tips.
Step 3: Shape Hedge Sides with a Wide-Bottom Taper
When trimming the sides of your Emerald Cedar row, always sculpt the tree into a slight A-frame or pyramidal profile. The top of the hedge must remain narrower than the base.
If the upper branches overhang or match the width of the lower branches, they block sunlight from reaching the bottom leaves. Over time, light starvation causes lower needles to drop, creating a bare, leggy base that never recovers.
To keep lines straight across formal hedges, stake a taut string line along your hedge row as a visual guide. Lightly trim back outer green shoots, cutting each branch just above an outward-facing bud or foliage node.
Pruning Style Cutting Technique Goal & Visual Outcome Natural Pyramidal Form Hand-pruning individual branch tips with bypass pruners back to branch junctions. Preserves natural layered habit, ideal for standalone specimen trees. Formal Privacy Hedge Light surface shearing along a uniform string line, tapering top inwards. Creates a tight, continuous green privacy wall along property lines.
For a deeper look into selecting the right pruning aesthetic for your yard, review this detailed Guide to cedar pruning techniques.
Step 4: Control Vertical Height Without Flat Topping
Once your evergreen approaches your desired height, you can manage vertical growth without resorting to severe topping. Instead of slicing horizontally through the trunk, perform selective tip reduction on central vertical stems.
Reach into the upper tip of the tree and locate the main central stem. Identify a strong lateral side branch growing outward at an angle below your target height line. Make an angled cut roughly 1/4 inch above that lateral branch.
By redirecting growth to side branches, you halt rapid vertical extension while keeping a rounded, natural crown. In early summer, soft green tips can also be pinched back using your thumb and forefinger. Tip pinching redirects energy into lateral growth, filling in sparse gaps and making the canopy thicker without hard tools.
Step 5: Provide Post-Pruning Hydration and Root Care
Trimming temporarily increases moisture loss across cut branch surfaces. Providing attentive care after pruning speeds up callousing and keeps trees stress-free.
Deep Hydration: Give your trees a thorough, deep soaking immediately following pruning, especially if trimming occurs during dry summer periods or warm spring spells.
Apply Mulch: Spread a 2 to 3-inch layer of organic mulch (such as shredded bark or wood chips) around the base of the trees. Keep mulch 3 to 4 inches away from the main stem to avoid bark rot. Mulch retains soil moisture, regulates root temperatures, and shields shallow cedar roots from summer heat.
Fertilizer Timing: Avoid applying high-nitrogen fertilizers immediately after heavy pruning, as this forces rapid shoot growth before wounds heal. Instead, apply a balanced, slow-release evergreen fertilizer in early spring as root activity resumes.
For larger properties or multi-tree privacy screens across Wasatch County, our experienced team provides comprehensive Residential Tree Services to handle structural maintenance, health checks, and deep root care.
Can You Trim Emerald Cedars in Late Fall or Winter?
Timing plays an essential role in cedar health. The absolute best window to trim Emerald Cedars is late winter to early spring (February through April), while the tree remains dormant and right before new growth flushes out. During early spring, rising sap carries nutrients that help cut sites heal quickly.
You should avoid heavy trimming in late summer and autumn (August through November). Pruning during fall stimulates fresh, tender growth that does not have enough time to harden off before high-altitude freezes arrive. First frost damages soft tender shoots, resulting in browning tips, winter dieback, and increased exposure to cold winter winds.
In winter, limit pruning strictly to removing branches damaged by heavy snow loads. If cold, dry winds dry out your foliage while the ground is frozen, consider wrapping young or exposed cedars with breathable burlap supported by wooden stakes.
Frequently Asked Questions About Trimming Emerald Cedars
Property owners often have specific questions regarding evergreen care, tree spacing, and stress recovery. Here are clear answers to common questions about managing Emerald Cedars. Find additional information on our centralized FAQs page.
How much foliage can you trim off an emerald cedar at one time?
Never remove more than one-third (33%) of the tree's total living foliage in a single pruning session. In fact, for mature or established Emerald Cedars, keeping foliage removal between 10% and 20% is far safer.
Exceeding these limits drastically reduces the plant's photosynthetic capacity, causing severe stress, stunt growth, or dieback. If an overgrown hedge requires significant reshaping, divide the work across two or three consecutive spring seasons rather than attempting a single aggressive cut.
What are the signs of over-pruning stress in an emerald cedar?
An over-pruned or stressed Emerald Cedar displays distinct warning symptoms:
Persistent Bronzing or Browning: Cut branch tips that turn yellow, bronze, or dry brown within days of trimming.
Sparse Canopy Gaps: Large open patches exposing bare interior stems where green needles were cut away completely.
Water Sprout Regrowth: Pale, spindly, chartreuse shoots sprouting aggressively from branch unions.
Delayed Spring Growth: Failure to produce vibrant light-green growth flushes when warm weather arrives.
If your tree exhibits these signs, pause all trimming for at least one full growing season. Provide deep, consistent watering during dry spells and ensure root zones are protected with organic mulch.
How far apart should emerald cedars be planted for a dense privacy hedge?
To grow a continuous, dense privacy screen, space Emerald Cedars 18 to 24 inches apart measured from trunk to trunk.
Spacing them closer than 18 inches causes severe root competition and starves lower interior foliage of light early in the tree's life. Spacing them farther than 3 feet creates wide gaps that take years to close. Planting at the recommended 18-24 inch interval allows side foliage to intermingle naturally into a uniform, green privacy wall while maintaining adequate air circulation and root space.
Keep Your Emerald Cedars Thriving with Local Care
So, can you trim emerald cedars safely? Absolutely. By keeping your cuts within the active green foliage zone, tapering hedge sides to let sunlight reach lower branches, avoiding destructive flat-topping, and trimming during late winter or early spring, your arborvitae will remain vibrant, dense, and structurally strong year after year.
While light tip maintenance is simple for most homeowners, managing tall hedges, correcting storm-damaged branches, or restoring overgrown rows requires specialized tools and expertise. Operating ladders on uneven mountain slopes or cutting thick stems near power lines poses real safety risks.
At Rocky Mountain Treecraft, we specialize in high-altitude tree care tailored specifically to the unique climate, soil, and winter conditions of Heber City, Heber Valley, and Wasatch County. Whether you need precise hedge maintenance, a thorough structural assessment, or fire mitigation trimming to clear defensible space around your home, our team provides fast, reliable, local service you can depend on.
Fire mitigation trimming focuses on reducing ladder fuels, managing overgrowth, and improving defensible space. These steps can reduce wildfire risk, but they cannot guarantee that trees, structures, or landscapes will survive a wildfire. Before following any specific clearance distances or defensible-space requirements, confirm current local and state guidance with fire officials or other official agencies.
Ready to restore the health and beauty of your landscape evergreens? Contact our local experts today to schedule a professional evaluation or request a free estimate for our professional Tree Trimming services.